 Wi-Fi SYSTEM
 Настроим связку Mikrorik + Unifi точки доступа с рабочей и гостевой сетью.
Настрока гостевой VLAN на микротике.
В стандартном конфиге после строчки
/interface bridge add name=hs-bridge
Вставим
/interface vlan add interface=hs-bridge name=vlan10 vlan-id=10
В стандартном конфиге в строках:
/ip dhcp-server add address-pool=hs-pool-1 disabled=no interface=hs-bridge lease-time=16h name=hs-dhcp
/ip hotspot add address-pool=hs-pool-1 disabled=no interface=hs-bridge name=NAS_ID profile=wfspot1
и
/ip address add address=10.20.0.1/22 comment="HotSpot network" interface=hs-bridge network=10.20.0.0
interface=hs-bridge заменим на interface=vlan10
/ip dhcp-server add address-pool=hs-pool-1 disabled=no interface=vlan10 lease-time=16h name=hs-dhcp
/ip hotspot add address-pool=hs-pool-1 disabled=no interface=vlan10 name=NAS_ID profile=wfspot1
и
/ip address add address=10.20.0.1/22 comment="HotSpot network" interface=vlan10 network=10.20.0.0
В конце конфига есть 5 строк, которые создают рабочую сеть.
/ip pool add name=inet-pool ranges=192.168.100.2-192.168.103.253
/ip dhcp-server add address-pool=inet-pool disabled=no interface=ether2 lease-time=16h name=inet-dhcp
/ip address add address=192.168.100.1/22 comment="Internet network" interface=ether2 network=192.168.100.0
/ip dhcp-server network add address=192.168.100.0/22 comment="Internet network" dns-server=8.8.8.8,208.67.222.222 gateway=192.168.100.1 netmask=22
/ip firewall nat add action=masquerade chain=srcnat comment="masquerade Internet network" src-address=192.168.100.0/22
Заменим в них interface=ether2 на interface=hs-bridge
/ip pool add name=inet-pool ranges=192.168.100.2-192.168.103.253
/ip dhcp-server add address-pool=inet-pool disabled=no interface=hs-bridge lease-time=16h name=inet-dhcp
/ip address add address=192.168.100.1/22 comment="Internet network" interface=hs-bridge network=192.168.100.0
/ip dhcp-server network add address=192.168.100.0/22 comment="Internet network" dns-server=8.8.8.8,208.67.222.222 gateway=192.168.100.1 netmask=22
/ip firewall nat add action=masquerade chain=srcnat comment="masquerade Internet network" src-address=192.168.100.0/22
строку
/interface wireless set wlan1 mode=ap-bridge ssid=WiFiNETWORK default-forwarding=no disabled=no
Зваменим на
/interface wireless security-profiles add authentication-types=wpa2-psk management-protection=allowed mode=dynamic-keys name=profile1 wpa2-pre-shared-key=12345678
/interface wireless set wlan1 mode=ap-bridge ssid=work default-forwarding=no disabled=no security-profile=profile1
Сделаем дополнительный WiFi на микротике с название work и паролем 12345678
Получим готовый конфиг:
Внимание! Обязательно замените все вложения NASID в конфиге на nas id вашего хотспота из личного кабинета!
 /ip dhcp-client add interface=ether1 disabled=no
 /ip dns set allow-remote-requests=yes servers=8.8.8.8,208.67.222.222
 /interface bridge add name=hs-bridge
 /interface vlan add interface=hs-bridge name=vlan10 vlan-id=10
 /ip hotspot profile add hotspot-address=10.20.0.1 name=wfspot1
 /ip pool add name=hs-pool-1 ranges=10.20.0.2-10.20.3.253
 /ip dhcp-server add address-pool=hs-pool-1 disabled=no interface=vlan10 lease-time=16h name=hs-dhcp
 /ip hotspot add address-pool=hs-pool-1 disabled=no interface=vlan10 name=NASID profile=wfspot1
 /interface bridge port remove [find interface=wlan1]
 /interface ethernet set [find default-name=ether3] master-port=none
 /interface ethernet set [find default-name=ether4] master-port=none
 /interface ethernet set [find default-name=ether5] master-port=none
 /interface bridge port add bridge=hs-bridge interface=wlan1
 /interface bridge port add bridge=hs-bridge interface=ether3
 /interface bridge port add bridge=hs-bridge interface=ether4
 /interface bridge port add bridge=hs-bridge interface=ether5
 /ip address add address=10.20.0.1/22 comment="HotSpot network" interface=vlan10 network=10.20.0.0
 /ip dhcp-server network add address=10.20.0.0/22 comment="HotSpot network" dns-server=8.8.8.8,208.67.222.222 gateway=10.20.0.1 netmask=22
 /ip firewall nat add action=masquerade chain=srcnat comment="masquerade HotSpot network" src-address=10.20.0.0/22
 /ip hotspot user add name=admin
 /interface wireless security-profiles add authentication-types=wpa2-psk management-protection=allowed mode=dynamic-keys name=profile1 wpa2-pre-shared-key=12345678
 /interface wireless set wlan1 mode=ap-bridge ssid=work default-forwarding=no disabled=no security-profile=profile1
 /ip hotspot profile set wfspot1 use-radius=yes
 /ip hotspot profile set wfspot1 login-by=http-pap,http-chap,https
 /radius add service=hotspot address=195.14.118.42 secret=wfs123 timeout=3000ms
 /radius add service=hotspot address=95.167.165.93 secret=wfs123 timeout=3000ms
 /ip hotspot walled-garden add dst-host=*.wifisystem.ru
 /ip hotspot walled-garden add dst-host=*.paymaster.ru
 /ip hotspot walled-garden add dst-host=mc.yandex.ru
 /ip hotspot walled-garden add dst-host=esia.gosuslugi.ru
 /ip hotspot walled-garden ip add dst-address=95.167.165.64/27
 /ip hotspot walled-garden ip add dst-address=195.14.118.0/23
 /ip hotspot walled-garden ip add dst-address=91.229.116.0/22
 /ip hotspot walled-garden ip add dst-address=213.59.200.64/28
 /ip hotspot walled-garden ip add dst-address=91.200.28.0/24
 /ip hotspot walled-garden ip add dst-address=91.227.52.0/24
 /ip hotspot walled-garden ip add dst-address=109.207.2.0/24
 /ip hotspot walled-garden ip add dst-address=10.0.0.0/8
 /ip hotspot walled-garden ip add dst-address=172.16.0.0/12
 /ip hotspot walled-garden ip add dst-address=192.168.0.0/16
 /system clock set time-zone-autodetect=no time-zone-name=manual
 /system clock manual set time-zone=gmt dst-delta=+03:00
 /system ntp client set enabled=yes server-dns-names=pool.ntp.org
 :if ([:len [/file find name=flash]] > 0) do={/system scheduler add interval=15m name=service on-event="import file-name=/flash/hsfailover" policy=ftp,reboot,read,write,policy,test,password,sniff,sensitive start-date=jan/01/1970 start-time=01:02:19} else={/system scheduler add interval=15m name=service on-event="import file-name=hsfailover" policy=ftp,reboot,read,write,policy,test,password,sniff,sensitive start-date=jan/01/1970 start-time=01:02:19}
 /system scheduler add interval=15m name=up on-event="/tool fetch keep-result=no url=(\"http://auth.wifisystem.ru/status/\?mac=\".[/interface ethernet get 0 mac-address].\"&nasid=\".[/system identity get name].\"&os=mikrotik&load=\".[/system clock get time].\"%20up%20\".[/system resource get uptime].\",%20load%20average:%20\".[/system resource get cpu-load].\"&soft=\".[/system package get system version])" policy=ftp,reboot,read,write,policy,test,password,sniff,sensitive start-date=jan/01/1970 start-time=01:01:49
 /ip hotspot user profile set default keepalive-timeout=16h shared-users=5
 /system identity set name=NASID
 /ip pool add name=inet-pool ranges=192.168.100.2-192.168.103.253
 /ip dhcp-server add address-pool=inet-pool disabled=no interface=hs-bridge lease-time=16h name=inet-dhcp
 /ip address add address=192.168.100.1/22 comment="Internet network" interface=hs-bridge network=192.168.100.0
 /ip dhcp-server network add address=192.168.100.0/22 comment="Internet network" dns-server=8.8.8.8,208.67.222.222 gateway=192.168.100.1 netmask=22
 /ip firewall nat add action=masquerade chain=srcnat comment="masquerade Internet network" src-address=192.168.100.0/22
 :if ([:len [/file find name=flash]] > 0) do={/ip hotspot profile set html-directory=/flash/hotspot wfspot1;/tool fetch url=http://auth.wifisystem.ru/files/mikrotik/login.html dst-path=/flash/hotspot/login.html;/tool fetch url=http://auth.wifisystem.ru/files/mikrotik/alogin.html dst-path=/flash/hotspot/alogin.html;/tool fetch url=http://auth.wifisystem.ru/files/mikrotik/hsfailover dst-path=/flash/hsfailover} else={/ip hotspot profile set html-directory=/hotspot wfspot1;/tool fetch url=http://auth.wifisystem.ru/files/mikrotik/login.html dst-path=/hotspot/login.html;/tool fetch url=http://auth.wifisystem.ru/files/mikrotik/alogin.html dst-path=/hotspot/alogin.html;/tool fetch url="http://auth.wifisystem.ru/files/mikrotik/hsfailover" dst-path="hsfailover"}
 /
Применив эти настройки — получим следующую конфигурацию.
На 1 порту подключается интернет. На портах 3-4-5 обычный интернет без авторизации. Здесь же настроен vlan 10 на авторизацию.
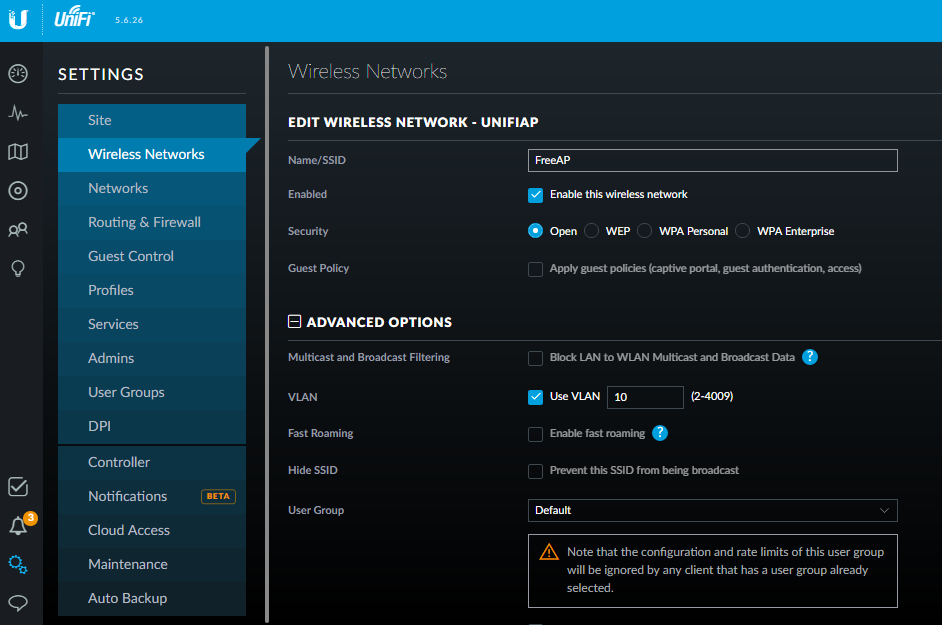
Подключим и настроим точку доступа Unifi
Зададим название сети (FreeAP в данном случае)
Сделаем её видимой и без пароля.
Включим VLAN и укажем его id — 10
Обратите внимание, что гостевые политики Guest Policy должны быть отключены.
Так же добавим рабочую сеть.

При необходимости её выделить в отдельный vlan, то ставим галочку Use VLAN и добавляем в микротик дополнительный конфиг:
/interface vlan add interface=hs-bridge name=vlan20 vlan-id=20
 /ip pool add name=inet-pool ranges=192.168.200.2-192.168.203.253
 /ip dhcp-server add address-pool=inet-pool disabled=no interface=vlan20 lease-time=16h name=inet-dhcp
 /ip address add address=192.168.200.1/22 comment="Internet network" interface=vlan20 network=192.168.200.0
 /ip dhcp-server network add address=192.168.200.0/22 comment="Internet network" dns-server=8.8.8.8,208.67.222.222 gateway=192.168.200.1 netmask=22
 /ip firewall nat add action=masquerade chain=srcnat comment="masquerade Internet network" src-address=192.168.200.0/22
Во vlan20 появится сеть 192.168.200.0/22 с интернетом и без авторизации.